Once roles have been created in Roles, they can be assigned to your users in Assign Roles.
Users will only be able to see their own IBOs and IBOs that belong to other users at, or below, their role in the hierarchy. See the example in Roles.
Users who have been given Administrator Access in Users will always have access to view and modify all IBOs, regardless of the roles they have been assigned.
High-light a role in the tree under Roles to see which users have been assigned to that role.
To add a user to a role, high-light the role and click the checkbox beside the user’s name to add them, then save.
To remove a user from a role, high-light the role and un-check the checkbox beside the user’s name, then save.
The Find field lets you quickly find users by name.
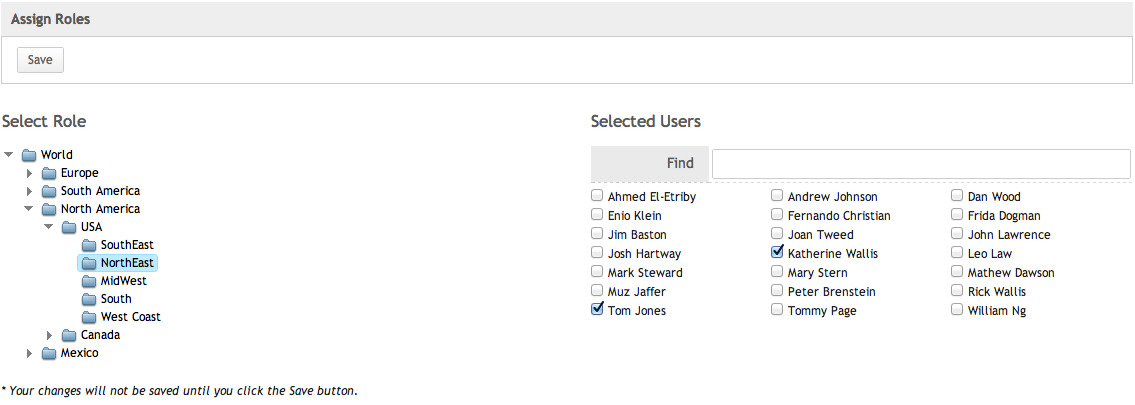
Example
In the example shown above, roles have been defined generally by Territory.
Users who are assigned to the World role will be able to view all IBOs for the entire organization and will be able to use the Global Filter to view the All IBO, Priority Views and Forecasts for any role, since they all fall under the World role in the hierarchy.
Users assigned to the USA role will only be able to access IBOs owned by users in the USA role and all others below it in the tree, including SouthEast, NorthEast, MidWest, South, and West Coast.
Users assigned to NorthEast will see all IBOs that are owned by other users in NorthEast role, but will not see IBOs owned by members of, for instance, SouthEast (and vice versa).
Remember, these roles define access to see IBOs but the powers that each user has over these IBOs (Read, Create, Edit, Delete, Export) is defined in each user’s settings in Users. Administrators will see all IBOs regardless of what roles they are assigned.
Overview
First, Administrators set up ASPEC Users. If Advanced Role Filter is enabled in Organization Profile. Administrators proceed to create Roles. The third step is to assign Users to their Roles.
Users who have been given Administrator Access in Users will always have access to view and modify all records, regardless of the roles they have been assigned.
Any other user can see records based on this user’s Role assignment. Furthermore, what the user can do with these records – edit, delete or just read – is based on that user’s User Profile. For example, a user can view an Account because of the Role assignment, but the user cannot edit that Account, because User Profile does not grant the right to Edit.
Linking Users and Roles
Highlighting a Role in the tree under Roles displays Users have been assigned to that Role.
To add a User to a Role, highlight the role and click the checkbox to the left of the user’s name to add them, then Save.
To remove a User from a Role, highlight the role and un-check the checkbox, then Save.
The Find field lets you quickly find users by name.
Example 1
In the example shown above, roles have been defined generally by geographical territory.
Users who are assigned to the World role will be able to view all records for the entire organization.
Users assigned to the USA role will only be able to access records owned by users in the USA role and all others below it in the tree, including SouthEast, NorthEast, MidWest, South, and West Coast.
Users assigned to NorthEast will see all records that are owned by other users in NorthEast role, but will not see records owned by members of, for instance, SouthEast (and vice versa).
Remember, these roles define access to see records but the powers that each user has over these records (Read, Create, Edit, Delete, Export) is defined in each user’s settings in Users. Administrators will see all records regardless of what roles they are assigned.
Example 2
Please read this post describing a different example of role hierarchy in Accounts.