Welcome to ASPEC SalesForce Edition. ASPEC Salesforce app is designed to allow a salesperson to better manage their sales opportunities.
This getting started guide is composed of two sections. In the first part of this guide focuses on how to configure ASPEC for Salesforce to get it up and running. The second part explains the method behind ASPEC app, it will help explain how our method can save you time and take your sales to the next level.
Configure ASPEC
This step will guide you through our recommended solution for customizing your instance using ASPEC components.
ASPEC for Salesforce is a connected app that uses Visualforce + Canvas. You will need to authorize the Canvas app and add a button and Visualforce section to your opportunity layout.
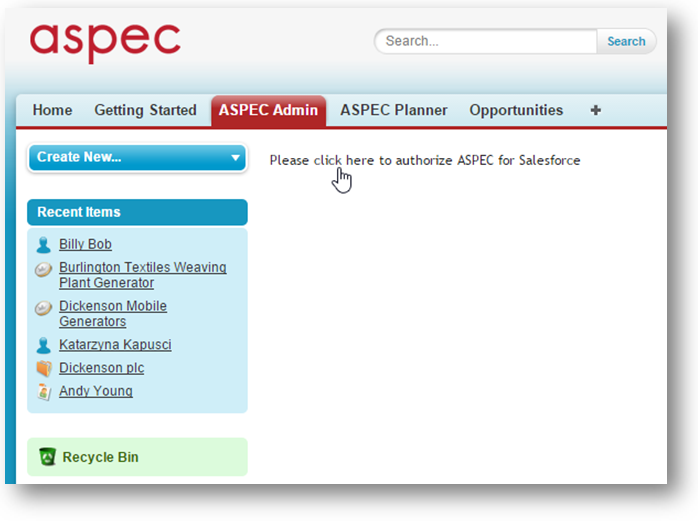
Step 1: Salesforce ASPEC Authorization
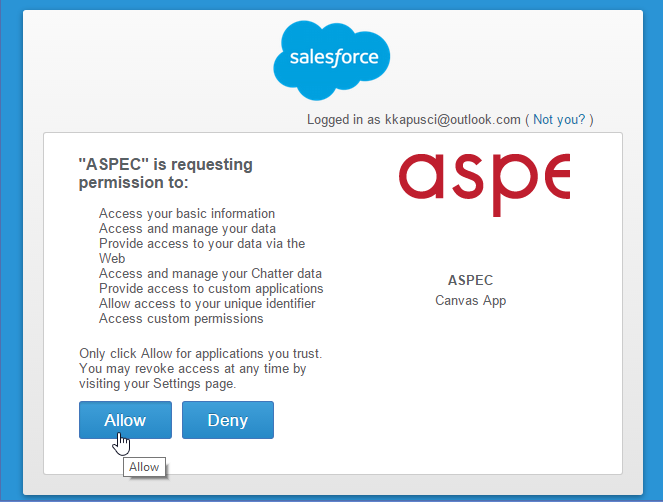
Click on the ASPEC Admin tab and authorize ASPEC App for Salesforce. *note that any users in in your organization Salesforce that will be using the application will also need to do a one time authorization when viewing ASPEC related elements.
Step 2: ASPEC App Setup
A. Authorized User Access (note, this step may already be completed for you with intended values as Salesforce now prompts application access during the initial installation).
Navigate over to the Salesforce setup section and on the left navigation bar navigate to Manage Apps > Connected Apps. A list of installed Apps will be presented. Click on ASPEC.

A list of installed Apps will be presented. Click on ASPEC. When inside ASPEC setup click the Edit button.

This is where you will need to configure the permitted users who can access the connected app. For simplicity, we are going to change the OAuth policies for Permitted Users to Admin approved users are pre-authorized. After you are done adjusting your connected app settings, click the Save button.

B. Profiles, Permissions Sets & Licenses
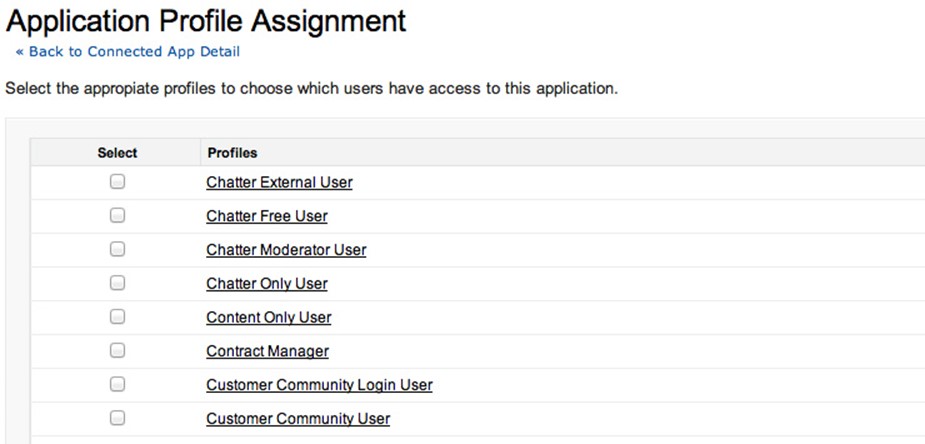
Locate the Click on the Manage Users > Profiles
From this screen, select all the profiles that you want to have access to ASPEC. Make sure you have selected System Administrator and click Save.

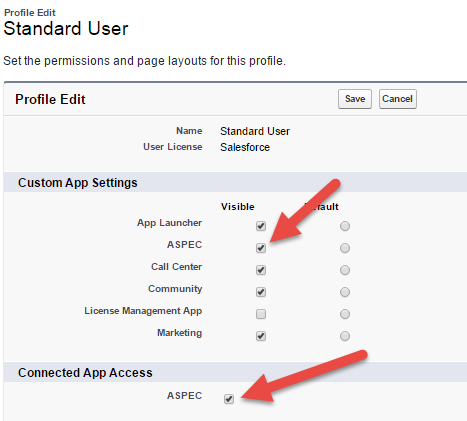
Select the profile you desire to give ASPEC access. Or edit all to add ASPEC to all profiles.
When in the desired profile, check ASPEC on the custom app settings area and Connected App Access Area
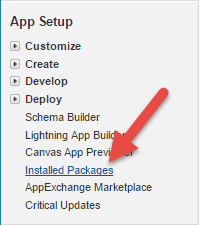
If you have more users than ASPEC licenses you may assign ASPEC access to users by navigating to Installed Packages
Select Manage Licenses and add desired users to ASPEC access list.

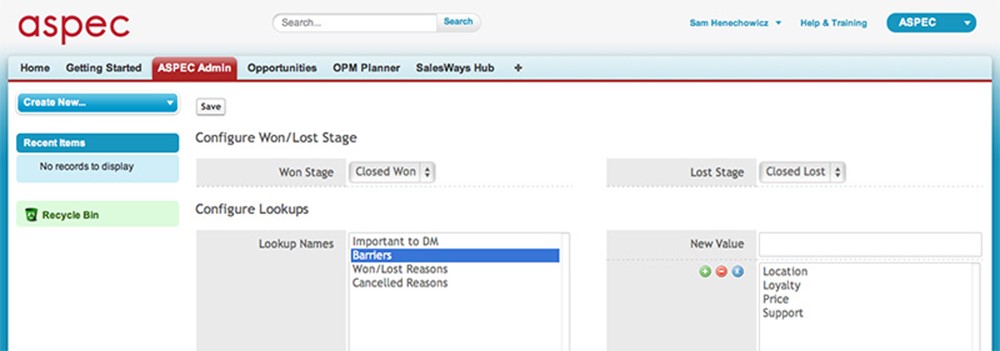
Once the save is complete, click on the ASPEC Admin Tab. From here you will need to configure the default won/lost stages as well as some custom fields used within ASPEC Expert Sales Coaching (What is important to the decision makers? What are the barriers? What were the Won/Lost/Cancelled reasons?).
You may skip this step and come back to it later. For now, it is important to check that the page loads and you do not have any Canvas related errors.
Once you have verified that you can render the Canvas app, the next step is to customize the standard opportunity layout.
Step 3: Opportunity Page Layout Configuration
In order to see ASPEC elements in your opportunity page we will need to make some changes to the opportunity page layout.
The follow section applies to organization that will only have specific users using ASPEC. If your organization plans to deploy ASPEC for all users skip to section Part B
SECTION A
(Only applies if you have specific users who will need to see ASPEC elements)
In this section we want to create a custom opportunity layout
From Setup, Customize -> Opportunities -> Page Layouts, click Edit beside the main layout for your opportunity

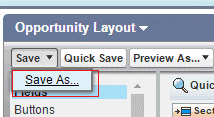
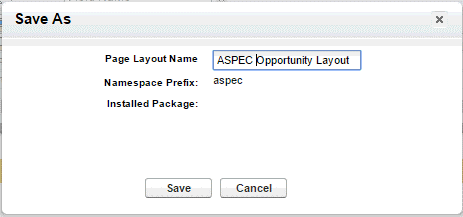
Then click Save -> Save As and give it a new name, for example “ASPEC Opportunity Layout”, save it. This will clone main layout to a new layout.
Then follow the original instruction to add in IBO essential fields and canvas app to the ASPEC Opportunity Layout.
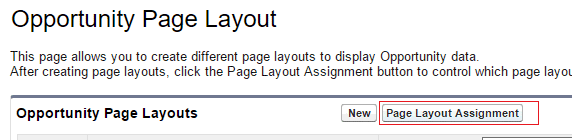
Click Page Layout Assignment
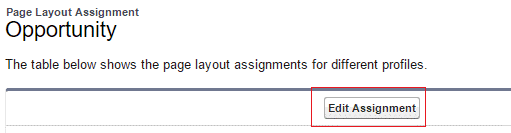
Click Edit Assignment
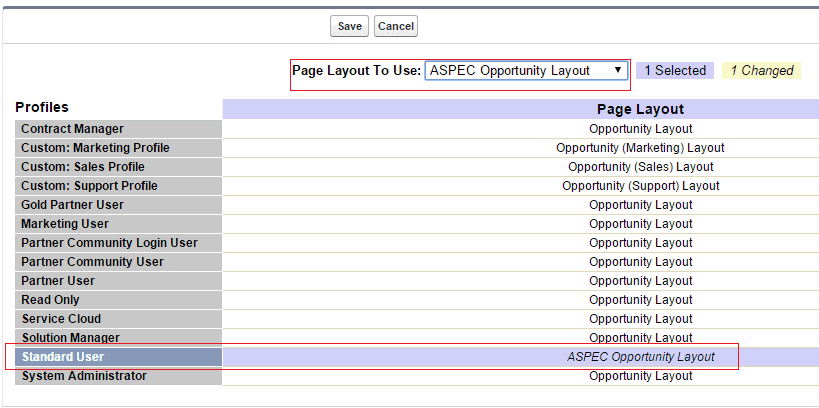
Select the profiles (customers may have different profile names) that will be using the new layout and assign the new layout name to it. Click Save. Now, only standard users see the new layout, all other users still see their original layout.
SECTION B
ASPEC for Salesforce is packaged with a Visualforce + Canvas page designed to be added to the standard opportunity layout.
Placing ASPEC Elements into our opportunity custom opportunity layout.
First, edit the layout by going to Setup > Build > Customize > Opportunities > Page Layouts.
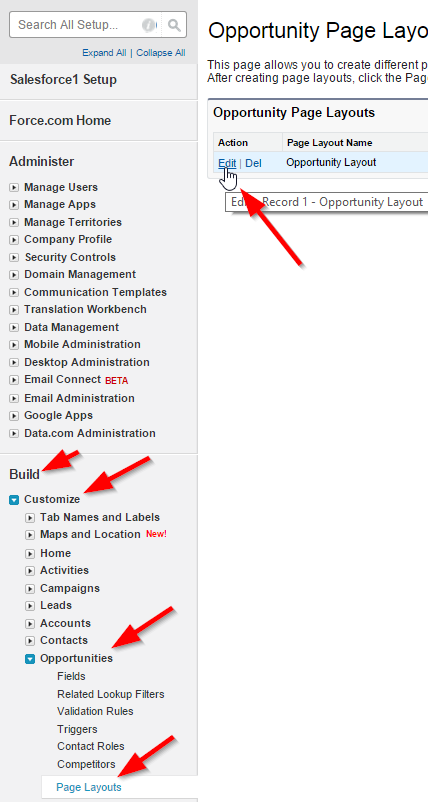
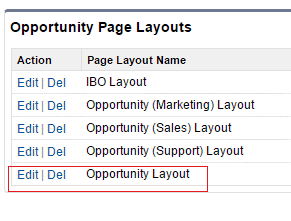
Click the Edit action next to Opportunity Layout. You will be redirected to a form builder that can be used to customize the opportunity layout. For simplicity, the following is our recommended solution based on the default Opportunity Layout. Your instance might be different based on your existing custom layout configuration.
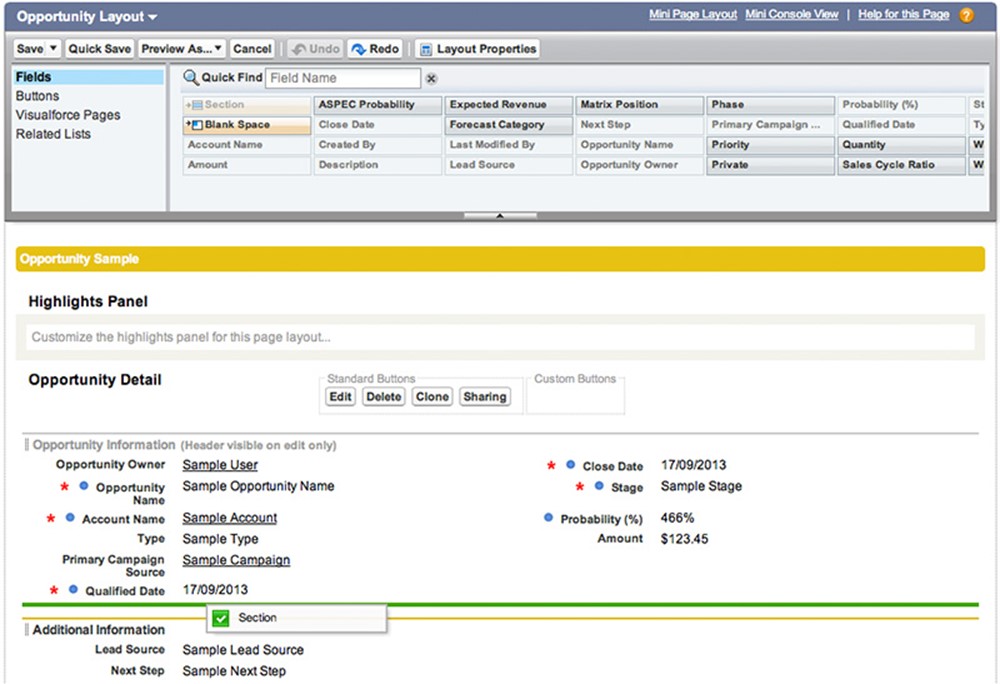
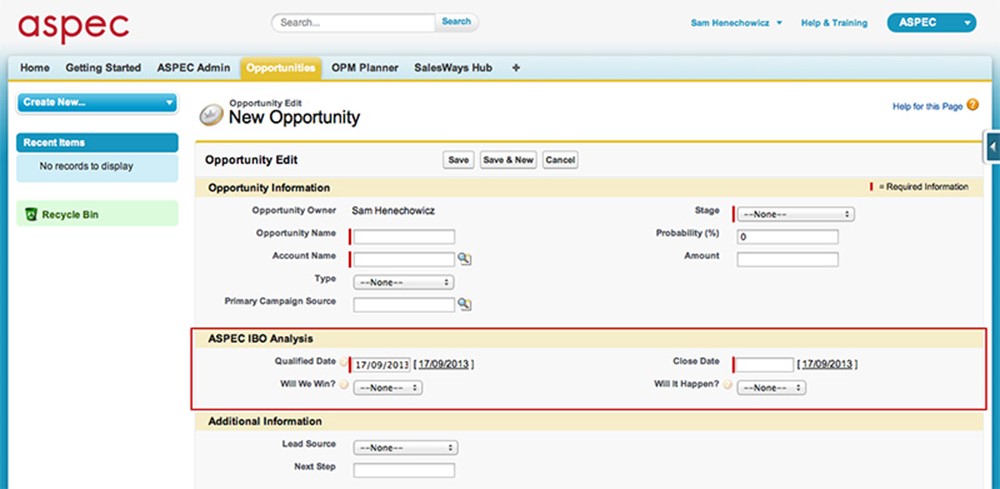
ASPEC builds a model of each individual opportunity from a few simple questions. We call these questions the IBO Essentials. We will need to add the IBO Essentials to the opportunity form to go along side the Visualforce + Canvas page.
A. Adding New Sections & ASPEC Fields
Start by creating a new Section by dragging the Section Field down below the existing Opportunity Detail section and above Additional Information.
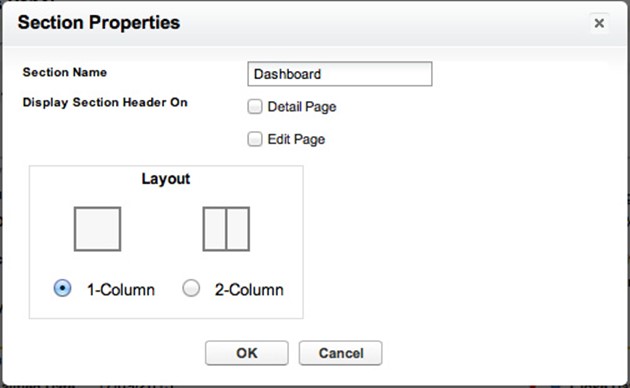
Enter the Section Properties for the new section.
- Section Name: ASPEC IBO Analysis
- Layout: 2-Column
Leave the checkboxes selected for Display Section Header On.
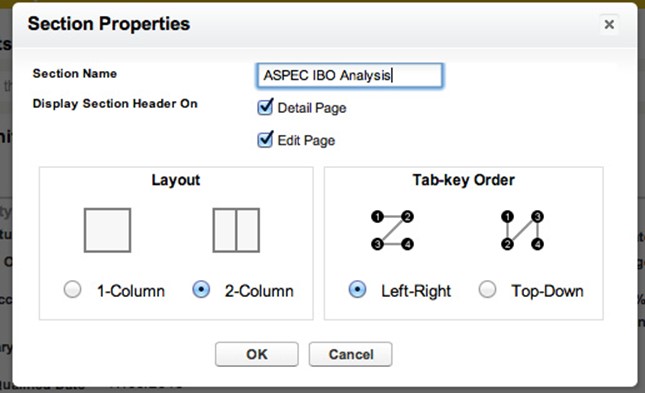
Click OK. You will now need to add the IBO Essentials to the ASPEC IBO Analysis section.
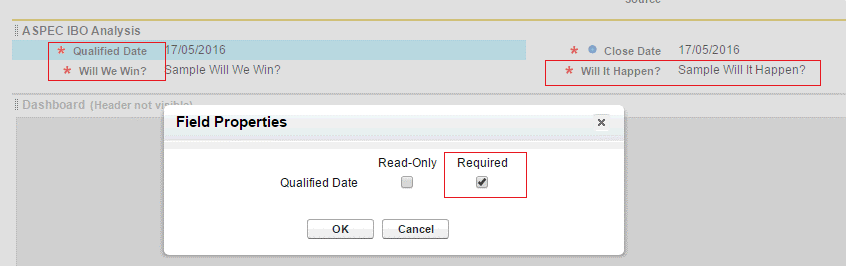
Drag down Qualified Date from inside the Opportunity Information section and place it at the top left of the new ASPEC IBO Analysis section. Next drag down Close Date and place it at the top right.
After that, drag down Will We Win and Will It Happen from the wizard and place them below Qualified Date and Close Date respectively.
While we are at it, let’s bring down ASPEC Probability and place it under Probability (%). ASPEC calculates its own probability based on the IBO Essentials.

*Important to allow users to save opportunities without filling out ASPEC fields you must make the fields not required. This will allow users to skip filling out ASPEC fields and allow them to save opportunity as per usual.
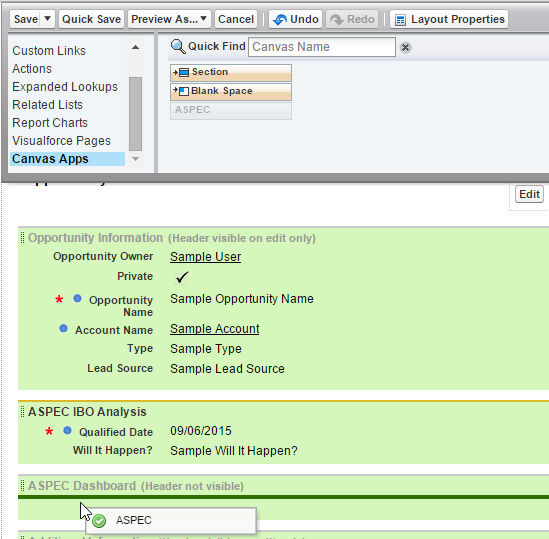
B. Adding ASPEC Canvas
Now it is time to add the Canvas page. Add another new section below ASPEC IBO Analysis.
- Section Name: ASPEC Dashboard
- Layout: 1-Column
Deselect the checkboxes for Display Section Header On. We do not want the header to be visible for this section.
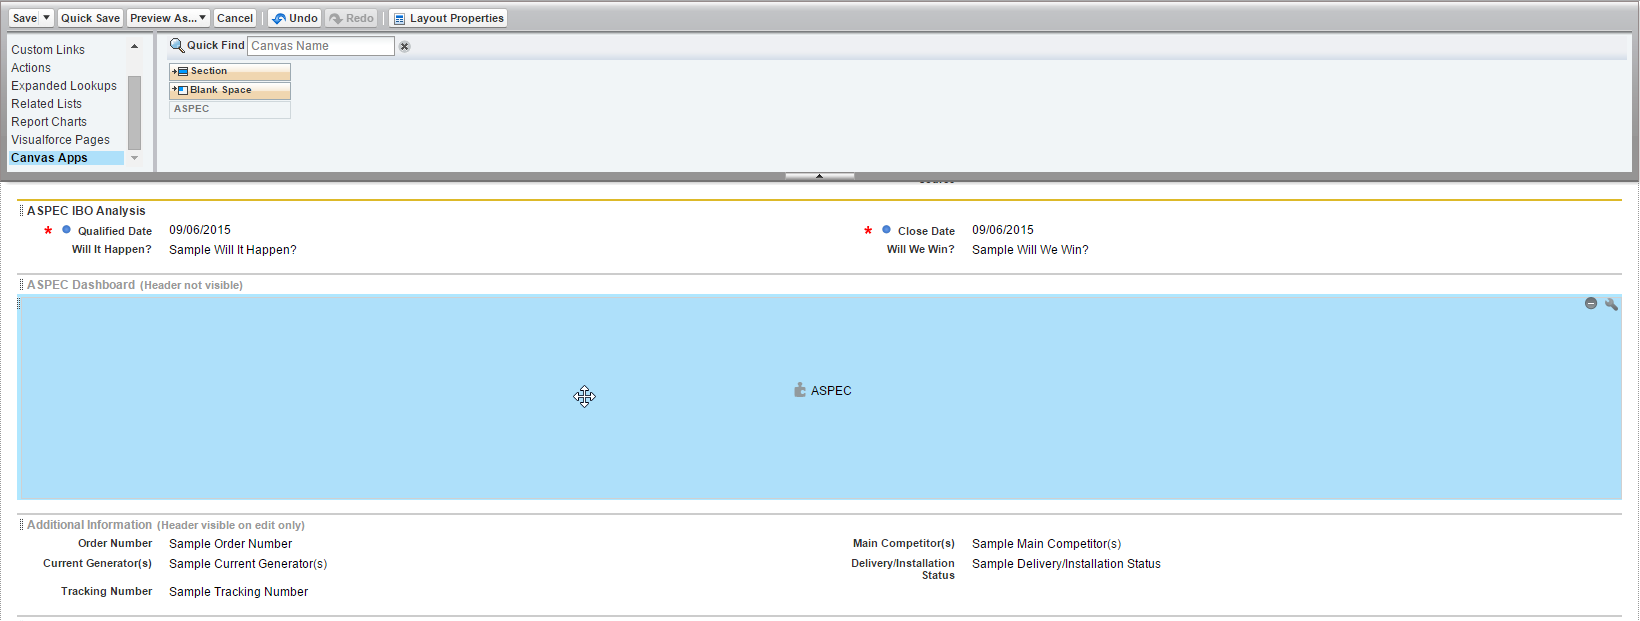
Click Canvas App from the left side of the wizard. Drag down ASPEC to the new Dashboard section.

Drag ASPEC to ASPEC Dashboard Section
Final Result
Click Buttons in the left side of the wizard. Drag down ASPEC Advisor Expert and place it inside the Custom Buttons area (next to Edit, Delete, Clone and Sharing).
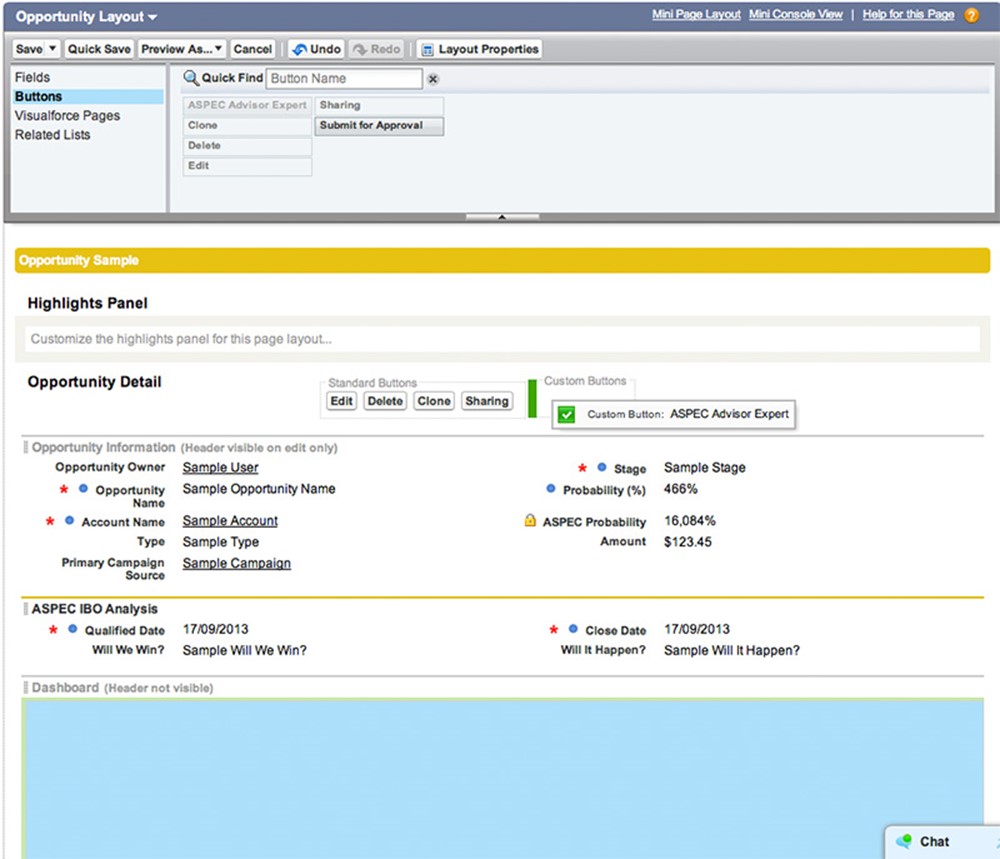
Click Save at the top left of the wizard.
Let’s check the layout is working properly by creating a new Opportunity. Click the Opportunities tab and then the New button.
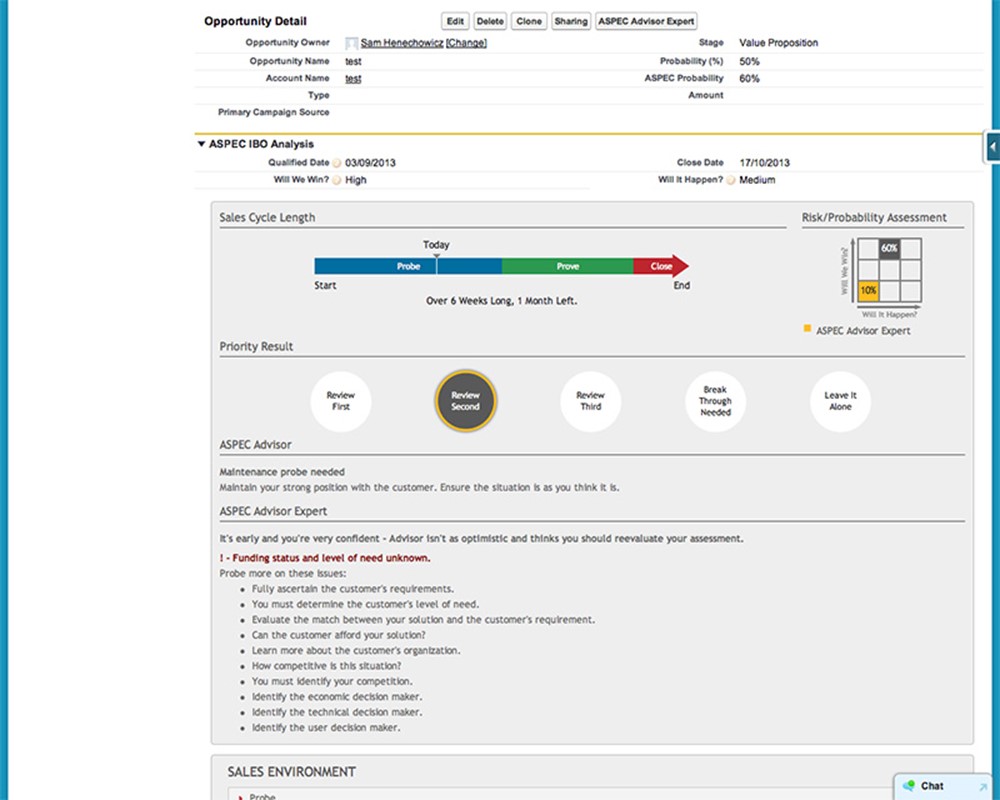
You should see the ASPEC IBO Analysis section complete with the IBO Essentials. The IBO Essentials are used to keep track of the sales cycle and to determine an accurate probability.
Fill out all the required information and click Save. You will be redirected to the Opportunity Detail page.
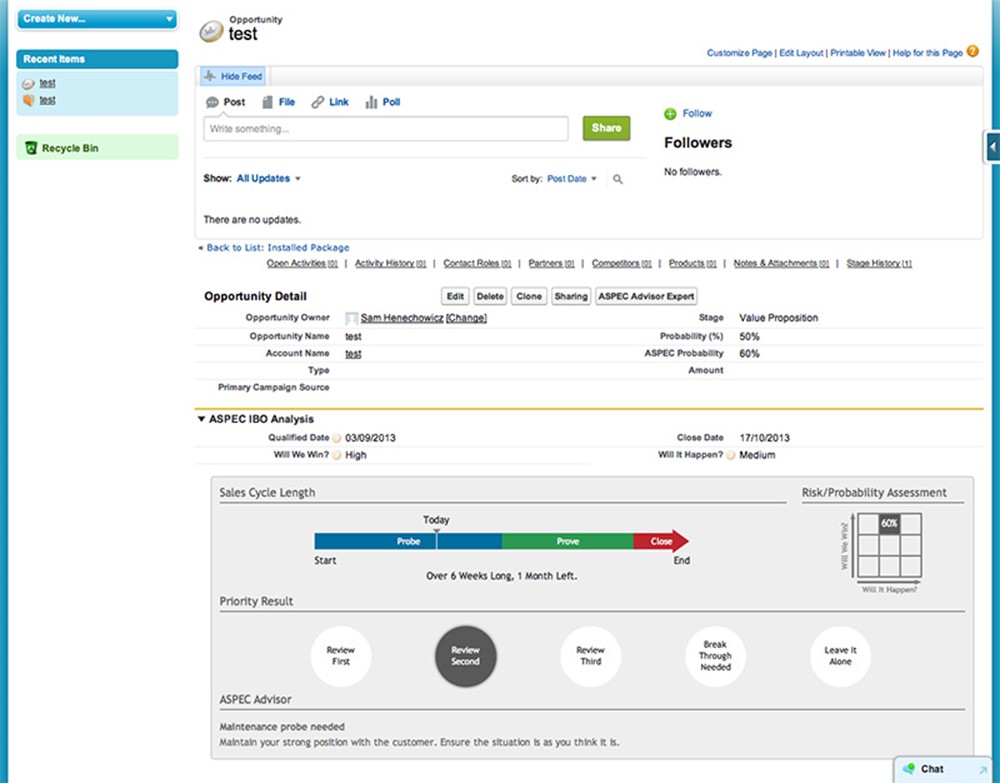
Notice how the ASPEC Probability has been calculated and an informative dashboard has been added to the opportunity.
If you do not see the dashboard, please contact us at support@salesways.com. Congratulations! You have successfully completed the installation of ASPEC for Salesforce.
Additional Information
Hide The Getting Started Tab
Feel free to hide the Getting Started tab. To do this, go to Setup > App Setup > Create > Apps and click the Edit action for ASPEC. From here you will be able to Choose the Tabs that you want displayed for ASPEC as well as the order they are displayed in.

How to Turn On Expert Sales Coaching
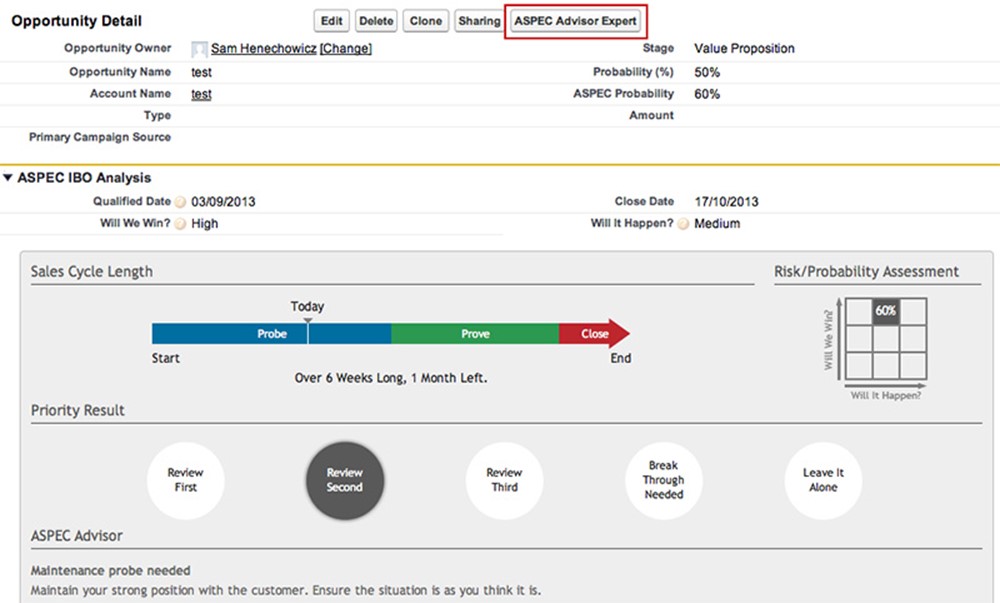
To turn on Expert Sales Coaching, from within an Opportunity Detail page, click the ASPEC Advisor Expert button. You will be redirected to a page from where you can work through the Sales Environment.
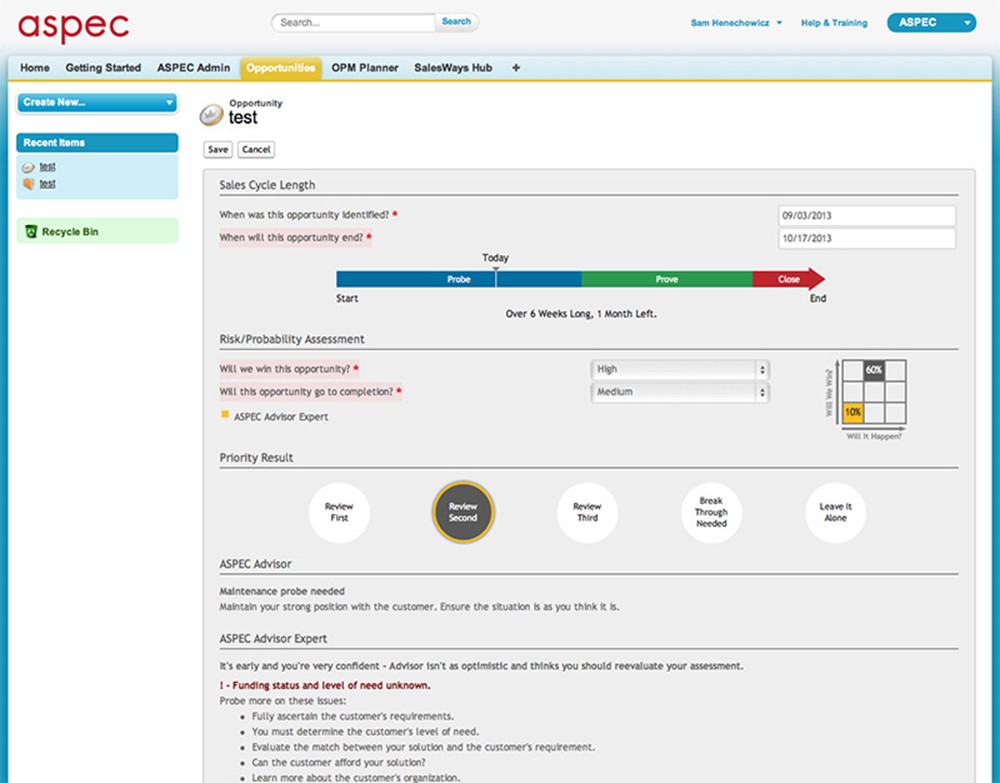
When you are done filling in the information, remember to click the Save button. You will be redirected back to the Opportunity Detail page. Notice how the dashboard now shows Expert Sales Coaching feedback.
The Methodology
Fill in the date that you expect the opportunity to close along with your ranking of the probability of the sale being awarded and your chances of winning the business. (see the section below titled Assigning Probability to an IBO for details on what to consider when filling in these values)
Assigning Probability to an Opportunity:
Every opportunity is unique; no two opportunities involve the same combination of products, customers or time constraints. After careful consideration, it can be determined that some opportunities are more significant than others. The challenge is determining exactly how important each opportunity is. Sales representatives evaluate opportunities by considering factors such as total value of the opportunity, amount of work already completed and progress in the sales cycle. However, it’s easy to overlook the most important factor of all probability. Probability must be considered when setting priorities because factors like total price and amount of work completed are irrelevant if the opportunity is out of reach to begin with. Because probability counts for so much, considerable emphasis should be placed on it. With information provided by the user, every opportunity is assigned a probability ranking. As the opportunity moves through the sales cycle, the user is expected to update the ranking to reflect new realities. Probability rank is used to prioritize opportunities, provide the salesperson with realistic forecasting totals and generate intelligent feedback on how to win the sale.
Calculating Probability:
There are many possible ways to arrive at a probability ranking for an opportunity. The challenge is implementing a universal method that can be used effectively. Some software applications ask the sales representative to randomly assign a percentage from zero to one hundred. Without explicit guidelines, these percentages are far from accurate. Sales Cycle Manager minimizes the guesswork and standardizes the way probability is assigned. Each time an Opportunity is created or reviewed, the user is given a chance to input or revise information governing the probability of winning the sale. To determine probability, the following questions prompt a response with ranks of high, medium, or low:
? Will it happen? (WIH)
? Will we get it? (WWGI)
Responses to each question (high, medium, or low) are applied to a grid called the “Probability Matrix” (shown below). There are nine boxes, or points, on the matrix, one for every possible combination of rankings. The nine points are known as the “Probability Index”.
INSERT IMAGE OF PROBABILITY MATRIX HERE
Each point on the “Probability Index” is given a probability percentage. The grid breaks down as follows:
INSERT IMAGE OF PROBABILITY INDEX HERE
Sales Cycle Phase
Within each sales opportunity there are three different selling skills that come into play to varying extent throughout the sales process. In the beginning of the sales process the predominant skill will be that of Probing. Trying to determine what is important to the customer. Later in the sales process the predominant skill will become Proving. Demonstrating a solution to the customer. The final skill in the sales process will be Closing. The final negotiation and winning of the sale.
Probing: The fundamental skill of probing is the ability of the salesperson to find out everything about the customer’s requirements and to discover all the issues that are behind their decision to purchase a product or service
Proving: The fundamental skill of proving is the ability of the salesperson to provide evidence to the customer and to convince them that the solution that they offer is the best
Closing: The fundamental skill of closing is the ability of the salesperson to uncover any barriers that prevent the customer from placing an order, and to overcome those barriers such that a decision can be made.
The three selling skills of Probing, Proving and Closing can be used together at different points of the sale, but it is helpful to think of the sales cycle as being divided into three distinct phases depending upon which skill is dominant at any given point in time.
INSERT SALES CYCLE PHASES IMAGE HERE
This divides the sales cycle into three phases of Probe, Prove, Close.
Prioritizing Opportunities
The probability rankings you generate help Sales Cycle Manager prioritize your opportunities. Along with probability, Sales Cycle Manager also considers another essential aspect of the sale time. This is because the sales representatives answers to “Will we get it”? And “Will it happen?” will mean something different depending on the phase of sales cycle they are in.
In general, the probability ranking will have more significance as the sales cycle nears its conclusion, and this is true for a number of reasons. Firstly, since the close of the sales cycle is when the customer will or will not be buying, it stands to reason that the probability assessed at that time will give a better indicator of whether or not the sale will happen. Secondly, the probability ranking will be more reliable as the sales cycle nears completion because the longer the opportunity persists, the more can be learned about the sale. This means that more will be known about the sale in the Close phase than in the Probe phase. Because there is less time to attempt new strategies in the Close phase (unlike the Probe phase which has come and gone), the probability ranking assigned later in the sales cycle is more likely to hold water, and it is the one that the sales representative will have to sink or swim with.
The Relationship between Probability and Sales Cycle Phase
The way probability ranking is interpreted will change depending on the sales cycle phase. This means the same point on the “Probability Index” in one phase will mean something very different in another phase.
Consider this scenario: In the Probe phase of the sales cycle, the customer has expressed that funding would not yet be available. Even if funding materialized, the customer is favoring the competition. The rank assigned to “Will it happen?” and “Will we get it?” will be “Low” for both.
In the Probe phase, when there’s still plenty of time before the customer makes a decision, a Low/Low ranking would be discouraging, but not worth abandoning the sale altogether. However, in the Close phase, when the opportunity is nearing the end of the sales cycle, the same ranking would indicate the opportunity is almost definitely lost.
Here is another example: An opportunity is so promising that it has been given a High/High ranking. The probability of winning this sale is high, so the opportunity requires less attention in the Probe phase. Instead, focus on the opportunities that require more work. The High/High ranked opportunity will later become a top priority in the Close phase, when it’s time to get the deal done.
Six Priority Levels
Sales Cycle Manager helps salespeople manage their time by prioritizing opportunities. Each opportunity is assigned one of six priority levels, as shown below. The priority assigned is based on the opportunity’s probability ranking and sales cycle phase. The priority list of IBOs can be viewed in the Sales Cycle Planner worksheet.
The first priority is the “Overdue” category. In this case, the customer has passed the date expected in the sales cycle and the sale is at risk of slipping away. Immediate attention is necessary.
The next most important category is Review First. These represent the best prospects, as well as opportunities that are likely to happen but still require a lot of selling. “Review Second” opportunities are less pressing than “Review First”, but still a fairly high priority. “Review Third” opportunities are typically out of reach or already likely to be won if the customer decides to buy.
Sales Cycle Manager puts up a red flag for opportunities in trouble. Opportunities that are given a “Breakthrough Needed” priority status require a bold strategy in order to get the customer’s attention, or get them more enthusiastic about buying. In these cases, a sale is likely to happen, but it’s also likely that the competition will get it. If a breakthrough cannot be achieved, an opportunity might be given a “Leave it Alone” ranking. “Leave it Alone” opportunities are of the lowest priority. Little or no time should be spent on these opportunities because the chances of winning the sale are extremely low.
Priority levels are determined by both the probability ranking and the sales cycle phase. Consider this example: An opportunity ranked as Low for both “Will it happen!” and “Will we get it” would be a “Review Second” priority while in the Probe phase, but would shift to “Leave it Alone” if no improvements were made by the Close phase. Similarly, an opportunity ranked High/High would be a Review Second priority in the Probe phase, but would improve to a “Review First” priority in the Close phase, when the Customer’s decision is imminent.
Sales Advisor
Sales Advisor is one of the ways Sales Cycle Manager helps salespeople sell more. As opportunities are being worked on, Sales Advisor provides feedback on how well a salesperson is doing and offers strategic advice for improvement. To do this, simply submit information about the progress of an opportunity. Sales Advisor does the rest.
Sales Advisor helps assess sales probability, prioritize opportunities, and plan the next move strategically. The only information required by Sales Advisor is the salesperson’s answers to two simple questions about sales probability, and the expected date of purchase for the opportunity. By considering sales probability and sales cycle phase, the computer is able to “understand” the situation and provide basic coaching on what to do next.
Sales Advisor can help users manage time more effectively by assigning a priority level to each opportunity. This way, opportunities can be worked on in order of importance. Sales Advisor calculates priority in a unique way. Since the probability assigned will mean something different depending on where the opportunity is in the sales cycle, Sales Advisor takes both factors into consideration when determining priority levels.