Overview
The IBO (Identified Business Opportunity) is your sales opportunity, your chance to sell your product or service to a customer who has a need to have it, and the ability to buy it.
Every opportunity is unique; no two Opportunities involve the same combination of products, customers or time constraints. After careful consideration, it can be determined that some Opportunities are more significant than others. The challenge is determining exactly how important each opportunity is.
IBO record tracks IBO details, such as Account, Contact, Status, Products, Owner, Team, as well as other characteristics, or “IBO Essentials“. Based on the IBO Essentials, the built-in Sales Advisor Pro provides feedback as a default. It also “grades” the IBO and suggests how important this IBO is in comparison with all other IBOs.
Depending on the edition of ASPEC you are using, you may take advantage of Sales Advisor Expert for extra advice and guidance. It is useful in strategic sales that may involve competition or multiple decision makers. Sales Advisor Pro is useful in simpler sales where you may not need the extra coaching provided by Sales Advisor Expert.
The Advisor provides a guideline and is not trying to squeeze anyone into any rigid process.
If you are interested to learn more about ASPEC’s unique Advisor, please read this post.
Note: you need to have an Account and a Contact to create an Opportunity.
IBO Form
Depending on the options configured for your Organization, the IBO form looks the same or similar to the images below.
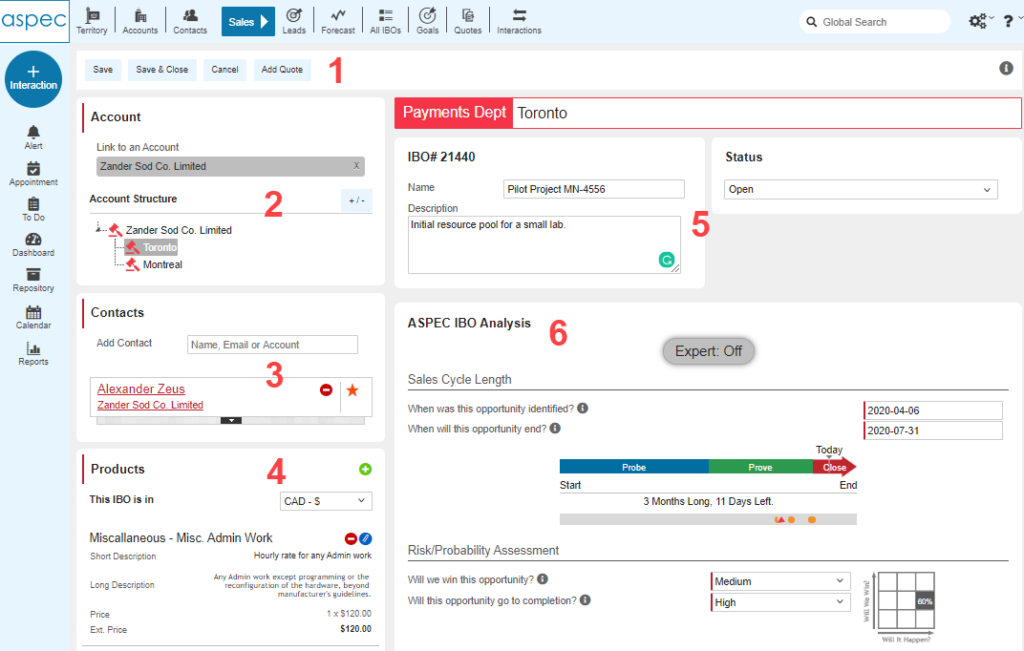
The top part of the IBO form is divided into the following sections:
1.Standard buttons, based on user’s privileges
2. Account and Account Structure: top-level Account linked to this IBO. If this is a multi-level Account, then one of its Sub-Accounts ( not top-level Account) is actually linked to this IBO. This section also displays all elements of the whole Account structure. IBO’s Sub-Account is highlighted in grey.
3. Contacts: this section shows a Primary and Secondary Contacts linked to this IBO. It includes a Contact selector. Entering Name, Email or Account and pressing enter results in searching ASPEC for matching Contacts.
4. Products related to this IBO.
5. IBO Information as IBO# ( automatically generated), Name and Description.
6. ASPEC IBO Analysis:
In a nutshell, in this section users enter 4 important fields (“IBO Essentials”) and are given a relevant feedback based on users’ risk assessment and the time in the Sales Cycle.
Optionally, users can enable an Expert option for more guidance. Moreover, Sales Cycle Graph displays 3 phases (degree of focus) and performed Interactions. Read more in this article.
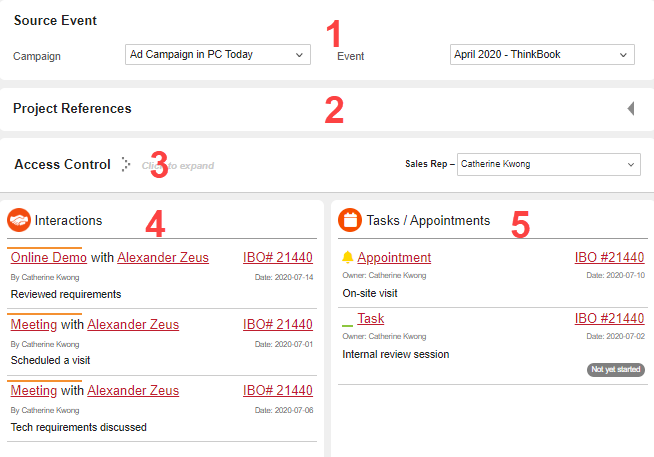
The bottom part of the IBO form contains the following sections:
Attachments: Under Products table. The files will be uploaded when the Save or Save & Close buttons are clicked. To remove a file click the red “-” button next to the file to be deleted.
1.Marketing Event, if the Marketing module is used by your Organization
2. Sections of Custom Fields, if configured by your Administrator
3. Access Control.
This section is designed to select the IBO Owner and the role(s) and, optionally, add Team Members.
All role members can see the IBO. All role members who have Modify All rights are also able to edit that IBO. If you want more people to read or edit the IBO, add Team Members to the IBO.
When assigning Team Members, click the green “+” button to add name(s). You will see all names in your Organization or just a subset, depending on the Organization Setup. To remove a Team Member click the red “-” button next to the name to be deleted.
All Team Members are able to view the IBO. Ability to Edit the IBO depends on the users’ rights set up in the individual User Profiles by the Administrator.
Adding Team Members with “Modify All” rights gives them Full Access rights to the IBO. Adding Team Members with “Edit” rights gives 2 options: Full Access or Add Interactions. Adding Team Members who don’t have “Modify All” Or “Edit” rights grants them to Read Only Access to the IBO.
Click User Permissions to view the individual user names who have access to the IBO.
Widgets:
4. Interactions related to this IBO.
Chances are you discovered this new opportunity though a communication with someone, probably the customer. You’ll want to quickly record this and future interactions to provide a record you can review and to help determine and implement your tactics for winning. Click “Add Interaction” to create a new Interaction from the Interaction Types configured by your Administrator.
5. Appointments and Tasks related to this IBO
You can add Appointments and Tasks related to this IBO. Based on your Subscriptions, you will be receiving reminder Emails about pending Appointments and Tasks. Moreover, ASPEC’s MS Outlook Add-In allows to synchronize ASPEC Calendar with MS Outlook Calendar.
Creating a new IBO
Select a Contact in a listview and click Create>IBO, or open a Contact and click “Add IBO”. A link to a Contact and its Account will be automatically provided. You should proceed with filling out Product(s) and IBO Essentials (the latter is found in ASPEC IBO Analysis section).
Depending on your ASPEC settings, configured by your Adminstrator, you might also be able to create an IBO from anywhere in ASPEC, and then link it to Account and Contact, or create a new Account and Contact on the same form.
If no Contact was selected prior to creating an IBO, you will see an empty Account and Contact. To fill out missing links, start typing in int he Contact box to find Contact and its Account links (recommended, although you can link Account and Contact separately).
Your list of contacts will pop up and drill down as you type. When you see the one you want, click on it and all the Contact and Account info is entered automatically. If the Contact does not exist, but you believe it is already entered, use ADVANCED CONTACT SEARCH. Othewise, create a new one by clicking ADD A NEW CONTACT.