Add, Activate or Modify User Accounts, User Privileges and Location Settings
To add or modify a name, email address, phone number, number format, language or time zone, go to the Users page in Setup. From here you can see all active and inactive users currently available.
At the top you will see the total number of Licenses available, as well as current Active Users.
Click Add to add a new user. See below for more details on configuring an individual user.
Select a user and click Delete to remove a user. Note that alternatively you can mark a user as inactive rather than deleting a user. An inactive user will not be able to log in to the software, but will remain assigned to IBOs. This can be useful when there is turnover – you can disable a users access without making decisions on who will be taking over his IBOs.
Click the Export button to export the user list. This will download a file in CSV Format (which can be opened in most popular spreadsheet programs) with all the users and their rights.
To quickly find a user, simply type right in the Filter box at the top of the screen. You can search on first name, last name, email, and phone number. The results will filter as you type.
To change a password, edit your profile by clicking your name in the users list, then click the “Change Password” button. Enter the users new password and click “Save”.
To open an existing user to review details, either single click the first name in the view, or double-click anywhere in the row.
User Form
When creating a new user or editing an existing user, you have a lot of options on how to configure what they can do.
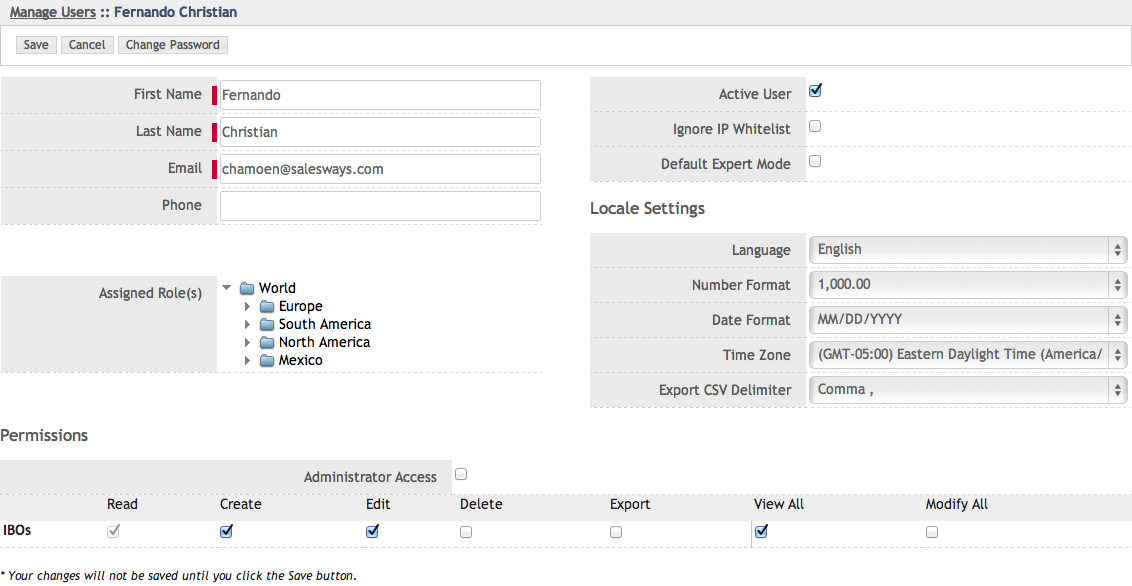
| USER OPTION | FUNCTION |
| First Name | The First Name of the user. |
| Last Name | The Last Name of the user. |
| The E-Mail address of the user. This is also used as the primary login for this user. | |
| Phone | The phone number for this user. |
| Assigned Roles | Shows which roles this user belongs to in your organization’s role hierarchy. Roles can be changed in Assign Roles. |
| Active User | When checked this will enable the user account. When un-checked, the user’s account will be suspended. They will not be able to login until their account is again set to “Active”. |
| Ignore IP Whitelist | Over-rides the organization’s Network Access settings for this user, giving them access from anywhere even when IP Whitelist is enabled for your organization. |
| Default Expert Mode | When enabled, new IBOs for this user will have Expert Mode as a default for ASPEC Advisor. This includes an additional set of questions where ASPEC Cloud will compare a calculated version of Will We Win and Will It Happen with the user’s selection. |
| Language | Set the language for this user. The default language for all users is set in Organization Profile. |
| Number Format | Set the local number format for this user. The default number format is set in Organization Profile. This allows each user to have numbers displayed to them in the local formats they expect. This does not affect currency symbol or number value. |
| Date Format | Over-rides the organization’s setting for Default Date Format for this user. The default setting for all users is set in Organization Profile. |
| Time Zone | Set the time zone for this user. The default time zone for all users is set in Organization Profile. |
| Export CSV Delimiter | Over-rides the organization’s default setting for Export CSV Delimiter for this user. The default setting for all users is set in Organization Profile. |
Permissions
The permissions section is where you can set the level of access a user has to ASPEC Cloud.
| Permission | Description |
| Administrator Access | Checking this option will give the user access to administrator options including the ability to manage Users, Roles, Lookup Options, Products, Network Access, and to Import IBOs. |
| IBOs | |
| Read | If selected, the user will have Read Access to IBOs that the user can see. This is the minimum level of access. If it is greyed out, it is because there is another option selected that requires Read access as a minimum (for instance, Edit). |
| Create | If selected, the user will be able to create IBOs. If it is greyed out, it is because there is another option selected that requires Create access as a minimum (for instance, Modify All). |
| Edit | If selected, the user will have Edit Access to IBOs that the user can see. If it is greyed out, it is because there is another option selected that requires Edit access as a minimum (for instance, Modify All). |
| Delete | If selected, the user will have Deletion Access to IBOs that the user can see. If it is greyed out, it is because there is another option selected that requires Delete access as a minimum (for instance, Modify All). |
| Export | If selected, the user will have the ability to Export IBOs that the user can see. If it is greyed out, it is because there is another option selected that requires Export access as a minimum (for instance, Modify All). |
| View All | If selected, the user will be able to see all IBOs in ASPEC. |
| Modify All | If selected, the user will be able to modify all records in ASPEC that they can see. |
To add or modify a name, email address, phone number, number format, language, or time zone, go to the Users page in Setup. From here you can see all active and inactive users currently available.
ASPEC Administrators have access to all User Profiles. Other users can view only their own profile to modify selected fields.
At the top, you will see the total number of Licenses available, as well as current Active Users.
Click Add to add a new user. See below for more details on configuring an individual user.
Select a user and click Delete to remove a user. Note that yous should consider marking a user as inactive rather than deleting a user. An inactive user will not be able to log in to the software but will remain assigned to IBOs and available for reporting and filtering. Please read more why we don’t recommend deleting users here.
Click the Export button to export the user list. This will download a file in CSV Format (which can be opened in most popular spreadsheet programs) with all the users and their rights.
To quickly find a user, simply type right in the Filter box at the top of the screen. You can search on first name, last name, email, and phone number. The results will filter as you type.
To change a password, edit your profile by clicking your name in the user’s list, then click the “Change Password” button. Enter the user’s new password and click “Save”.
To open an existing user to review details, either single click the first name in the view, or double-click anywhere in the row.
User Profile
Please read more in this post on individual User Profiles.